

Pilates Exercise Dive: Shoulder Bridge
Choreographically simple but deeply layered? Yes please!

Shoulder Bridge is one of my favourite Pilates exercises!
If you know me, you know I pretty much feel this way about all of the Pilates exercises except maybe ahem, Leg Pull.
Why I love Shoulder Bridge
Because it's one of the exercises I turn to when I'm feeling strong, or when I'm feeling a bit fragile, or when I'm at all the other points on that strong > fragile continuum. Yes, I do it literally all the time.
Shoulder Bridge is an exercise that we can use to baby ourselves when we need a bit of nurturing or push ourselves when we want a challenge.
Even though Shoulder Bridge is a regular mat exercise, it's often included in Pre-Pilates work because it can be modified down so that a version of the exercise is available to 99% of folks. It has a lot of great things to offer depending on what's emphasised.
Like other Pilates Method exercises the actual choreography is quite simple (lift your hips up and then lower them down) but of course, we can explore many things and concepts inside of that simplicity.
On to the Shoulder Bridge Deep Dive
First, as per usual, let's talk about exactly WHAT it is, and also the many benefits we can find inside of the exercise.
Then we'll move on to how to perform it in three ways:
basic
scaled back or remedial
the advanced version.
Woven through will be the things to pay attention to or emphasise depending on what we want to feel, be made aware of, or strengthen, and/or stretch while we're performing the Shoulder Bridge. (ahem, sorry if that last sentence had a whole heap of run-on, jammed into it, information inside)
WHAT:
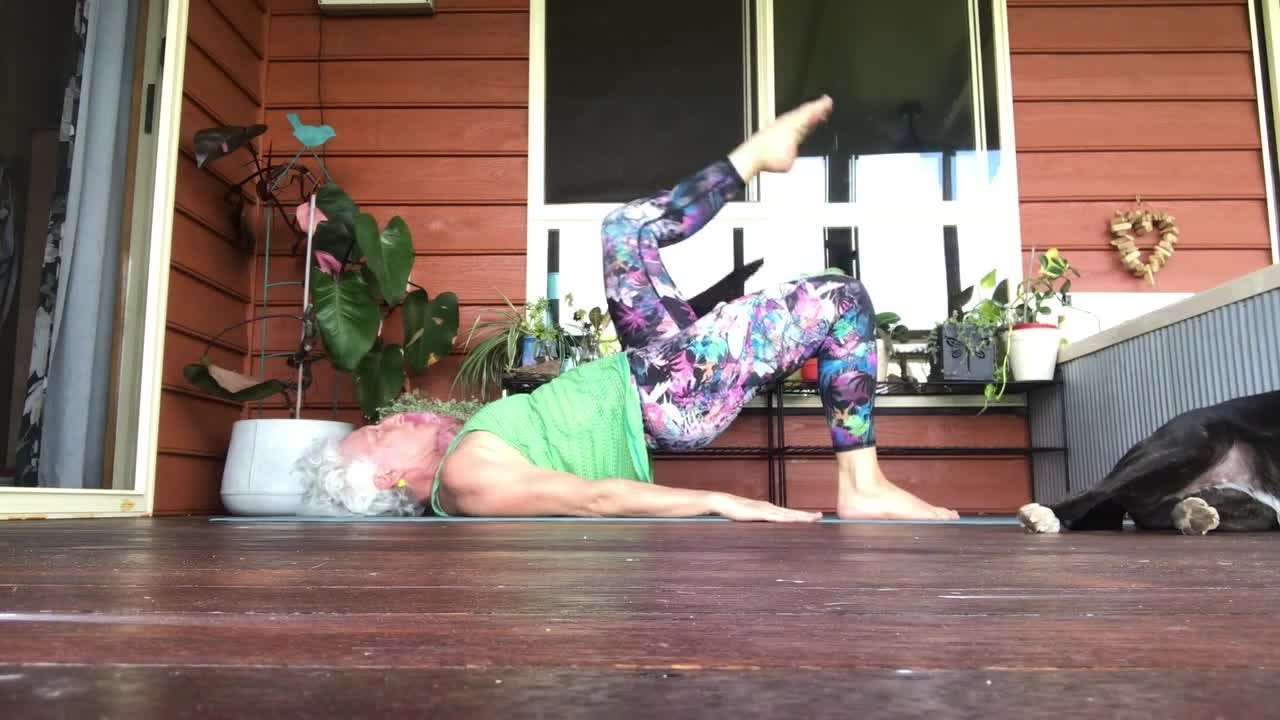
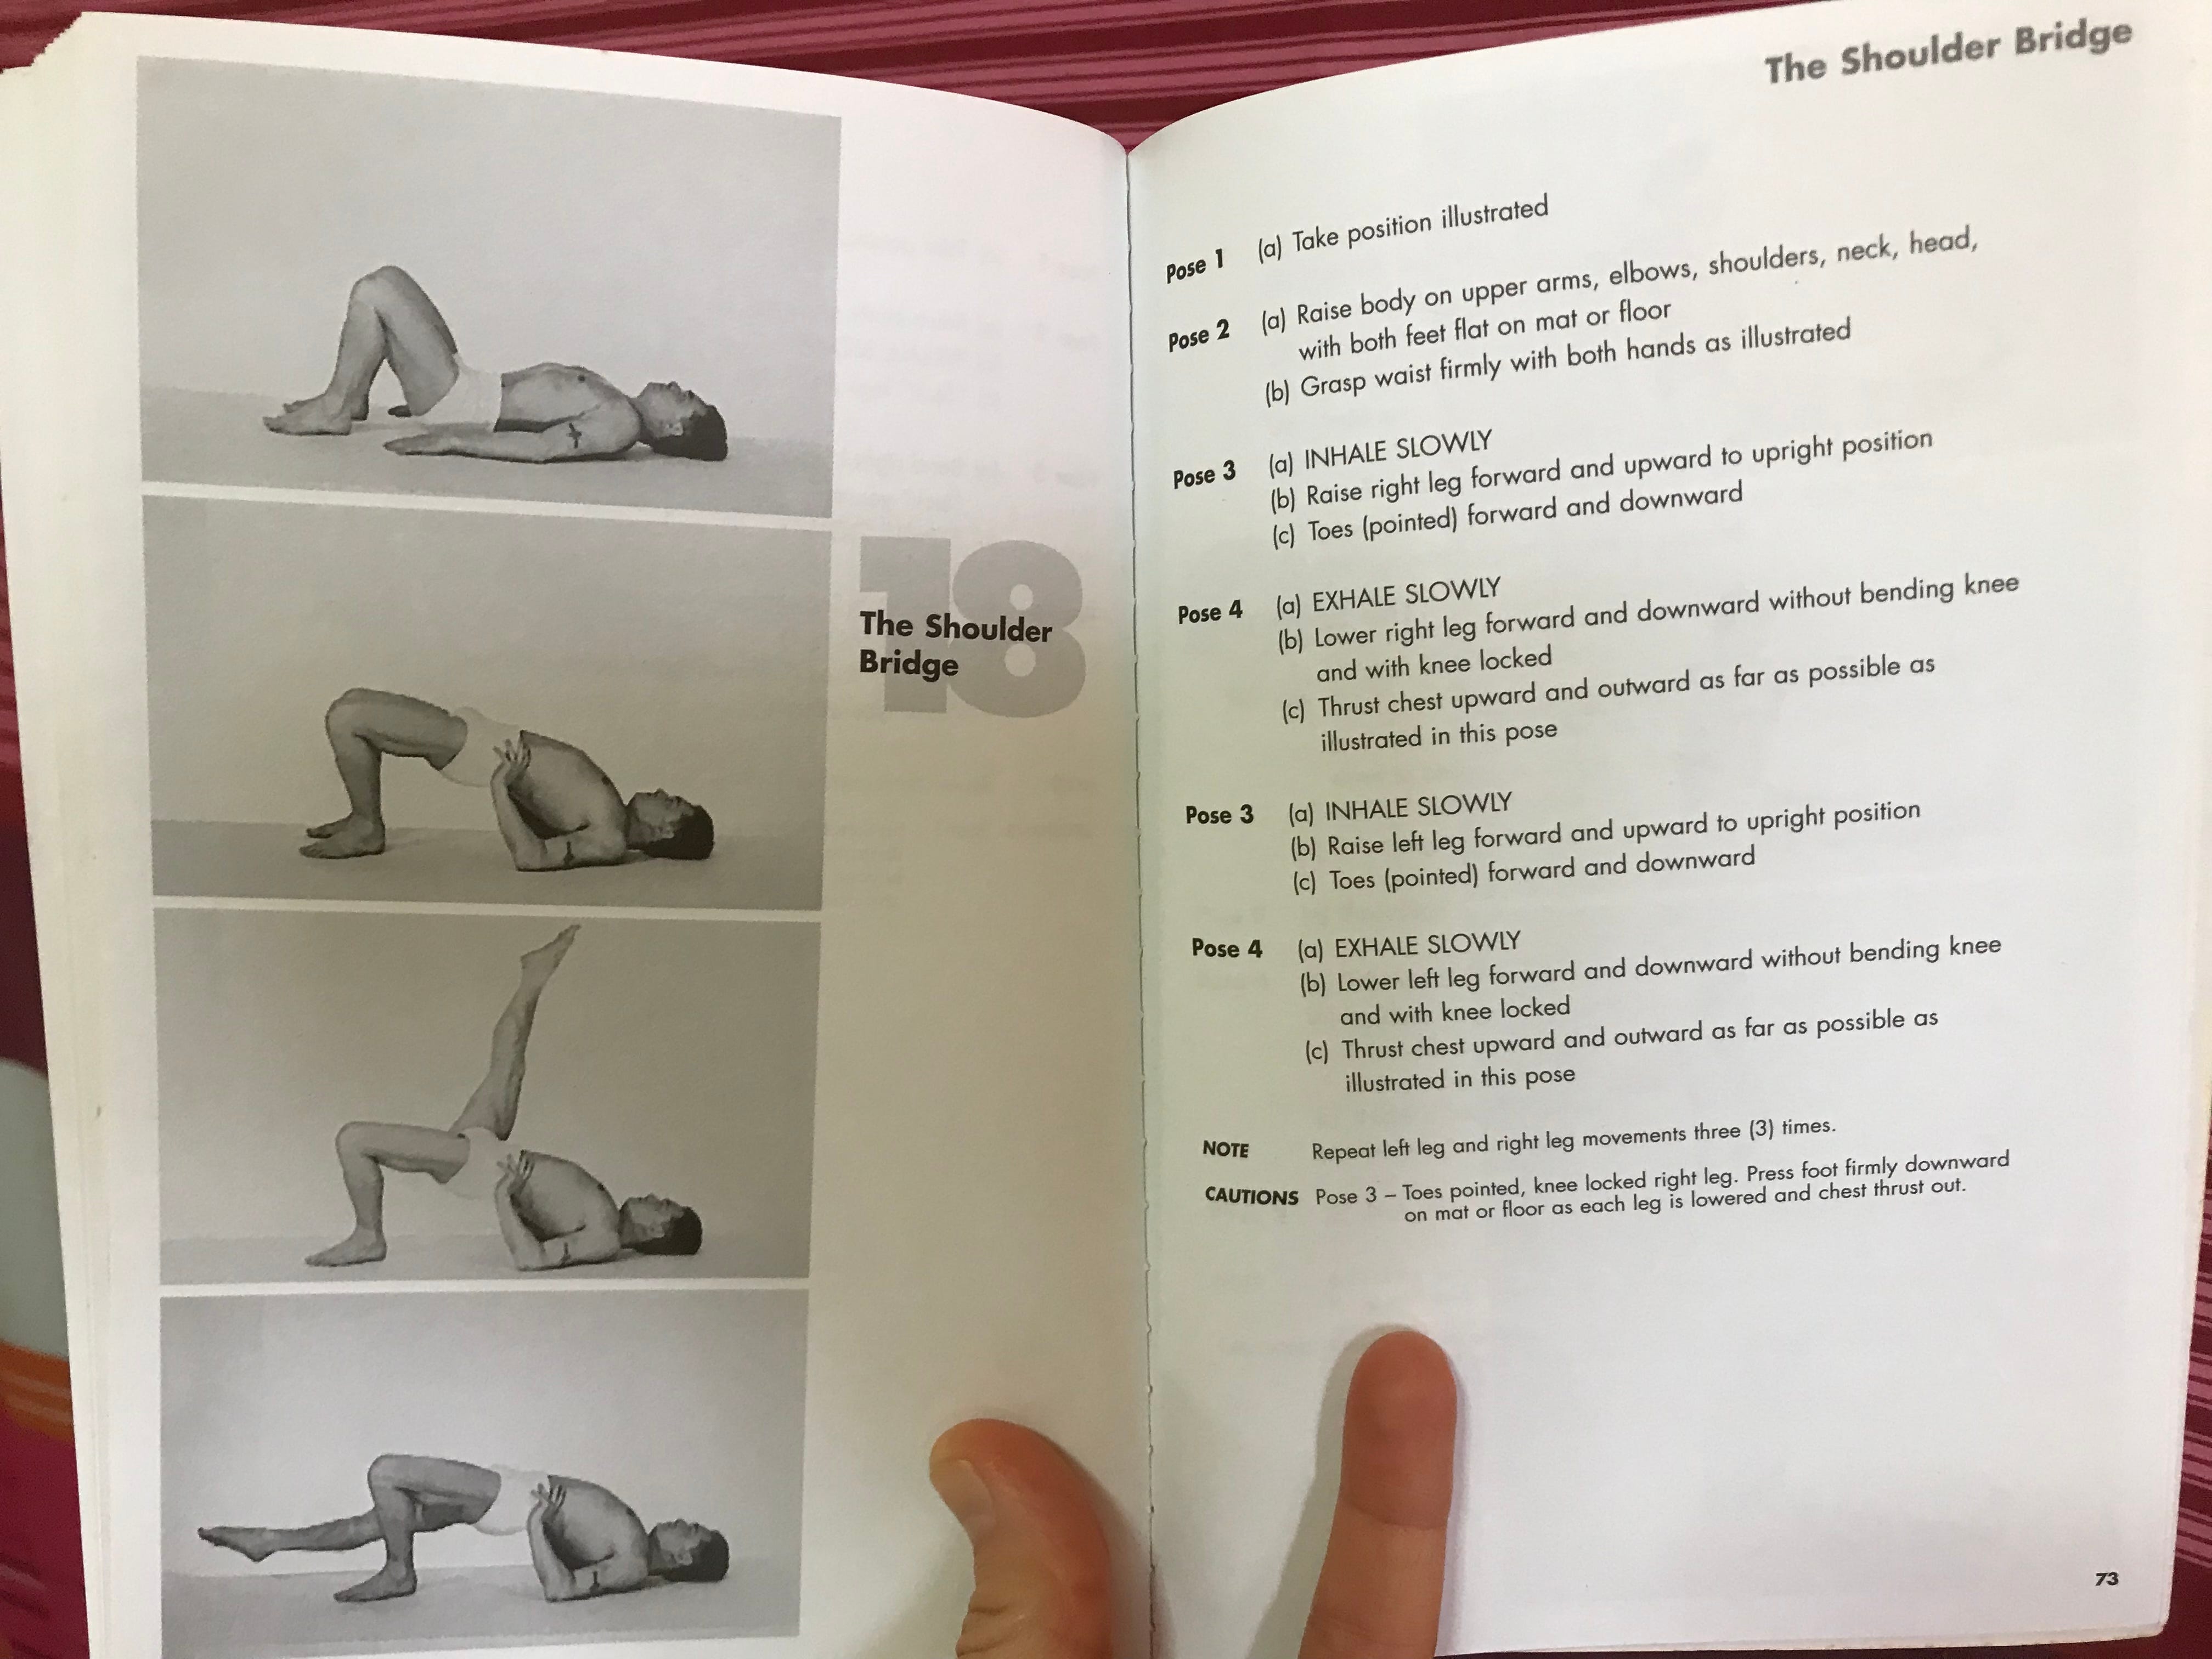
Shoulder Bridge is number 18 in Joseph Pilates' original 34 Mat exercises. It comes after Scissors/Bicycle and once you roll down from your last repetition of the bridge, you sit yourself up for the Spine Twist. the transition from Scissors/Bicycle into the Shoulder Bridge is shown at the end of the vid at the bottom of the post.
Generally you'll perform 5-8 repetitions.
While it's good to remember that every Pilates exercise is a full bodied exercise, here are some of the specific benefits of Shoulder Bridge:
Strengthening the hips (including glutes) and legs
Finding the articulation of the spine, tail to head on the way up, and head to tail on the way down and figuring out where you don't bend so good...
Working on alignment through the feet, legs, pelvis and torso and uniformly developing the body side to side
Balancing out the work between the inner and outer thighs
Greater awareness of grounding through the feet
Waking up and engaging the shoulder girdle specifically the backs of the arms into the rotator cuff
Traction-ing the spine using the two way stretch & oppositional energy
Connecting the breath to the movement for greater fluidity
Maintaining the use of the deep belly muscles all through the exercise so that the spine can gain mobility (see articulation above)
Laying the groundwork for the more advanced repertoire that asks you to support yourself with your shoulder girdle and upper back (some examples: the aforementioned Scissors/Bicycle as well as, Swan Dive, Jackknife, Control Balance, Hip Circles, & Rocking)
HOW To Perform Shoulder Bridge
BASIC version:
Lie on your back with knees bent, legs hip width apart, feet flat on the mat. (I believe the physio world calls this the hook lying position but I don't know why that doesn't work for me?)
Legs and feet are in what I call the Goldilocks Position: not too close, not too far, not too wide, and not too narrow. I tell my clients to have their legs hip joint width apart with the heels close enough to their sitzbones that their hip flexors are soft. (note, this is different to how I've been taught in yoga classes where the legs tend to be wider and the feet tend to be closer to the bum - for me this makes me overuse my outer hips and puts strain on my knees)
Begin by lengthening the spine from the crown of the head to the tail, you should have slight lumbar extension (i.e. a bit of space under your low back) because you want to start in as neutral pelvic alignment as is available for your body. Generally your hip bones and your pubic bone should be on the same horizontal place.
Next, you're going to begin to roll up by moving your pelvis into a deep abdominal scoop, aka a posterior pelvic tilt. As you do this you're also going to think about traction-ing your tail to your heels and as your hips lift dragging your sitzbones up the back of your calves to the back of your knees.
You'll draw the abdominals in and up towards the spine, peeling one bone at a time up off your mat until your pelvis and back are lifted in a straight line from the shoulders to the knees.
Reverse the sequential movement and smoothly roll yourself back down to the starting position.
Pay attention to the feet and legs trying to keep the knees aligned over the second toe, this will engage the inner thighs.
REMEDIAL Version:
(this one is usually doable even if your back is not feeling so grand)
Start as above but do not move into a scoop!
Press firmly into the feet to turn on the glute/hamstring connection and lift your hips a few centimetres or inches off the mat
Maintain the deep low abdominal lift in and up to support the low back and,
Hold
Roll your spine down as you think of pulling your tail to your heels
Repeat coming up with a flat back and then rolling down one bone at a time
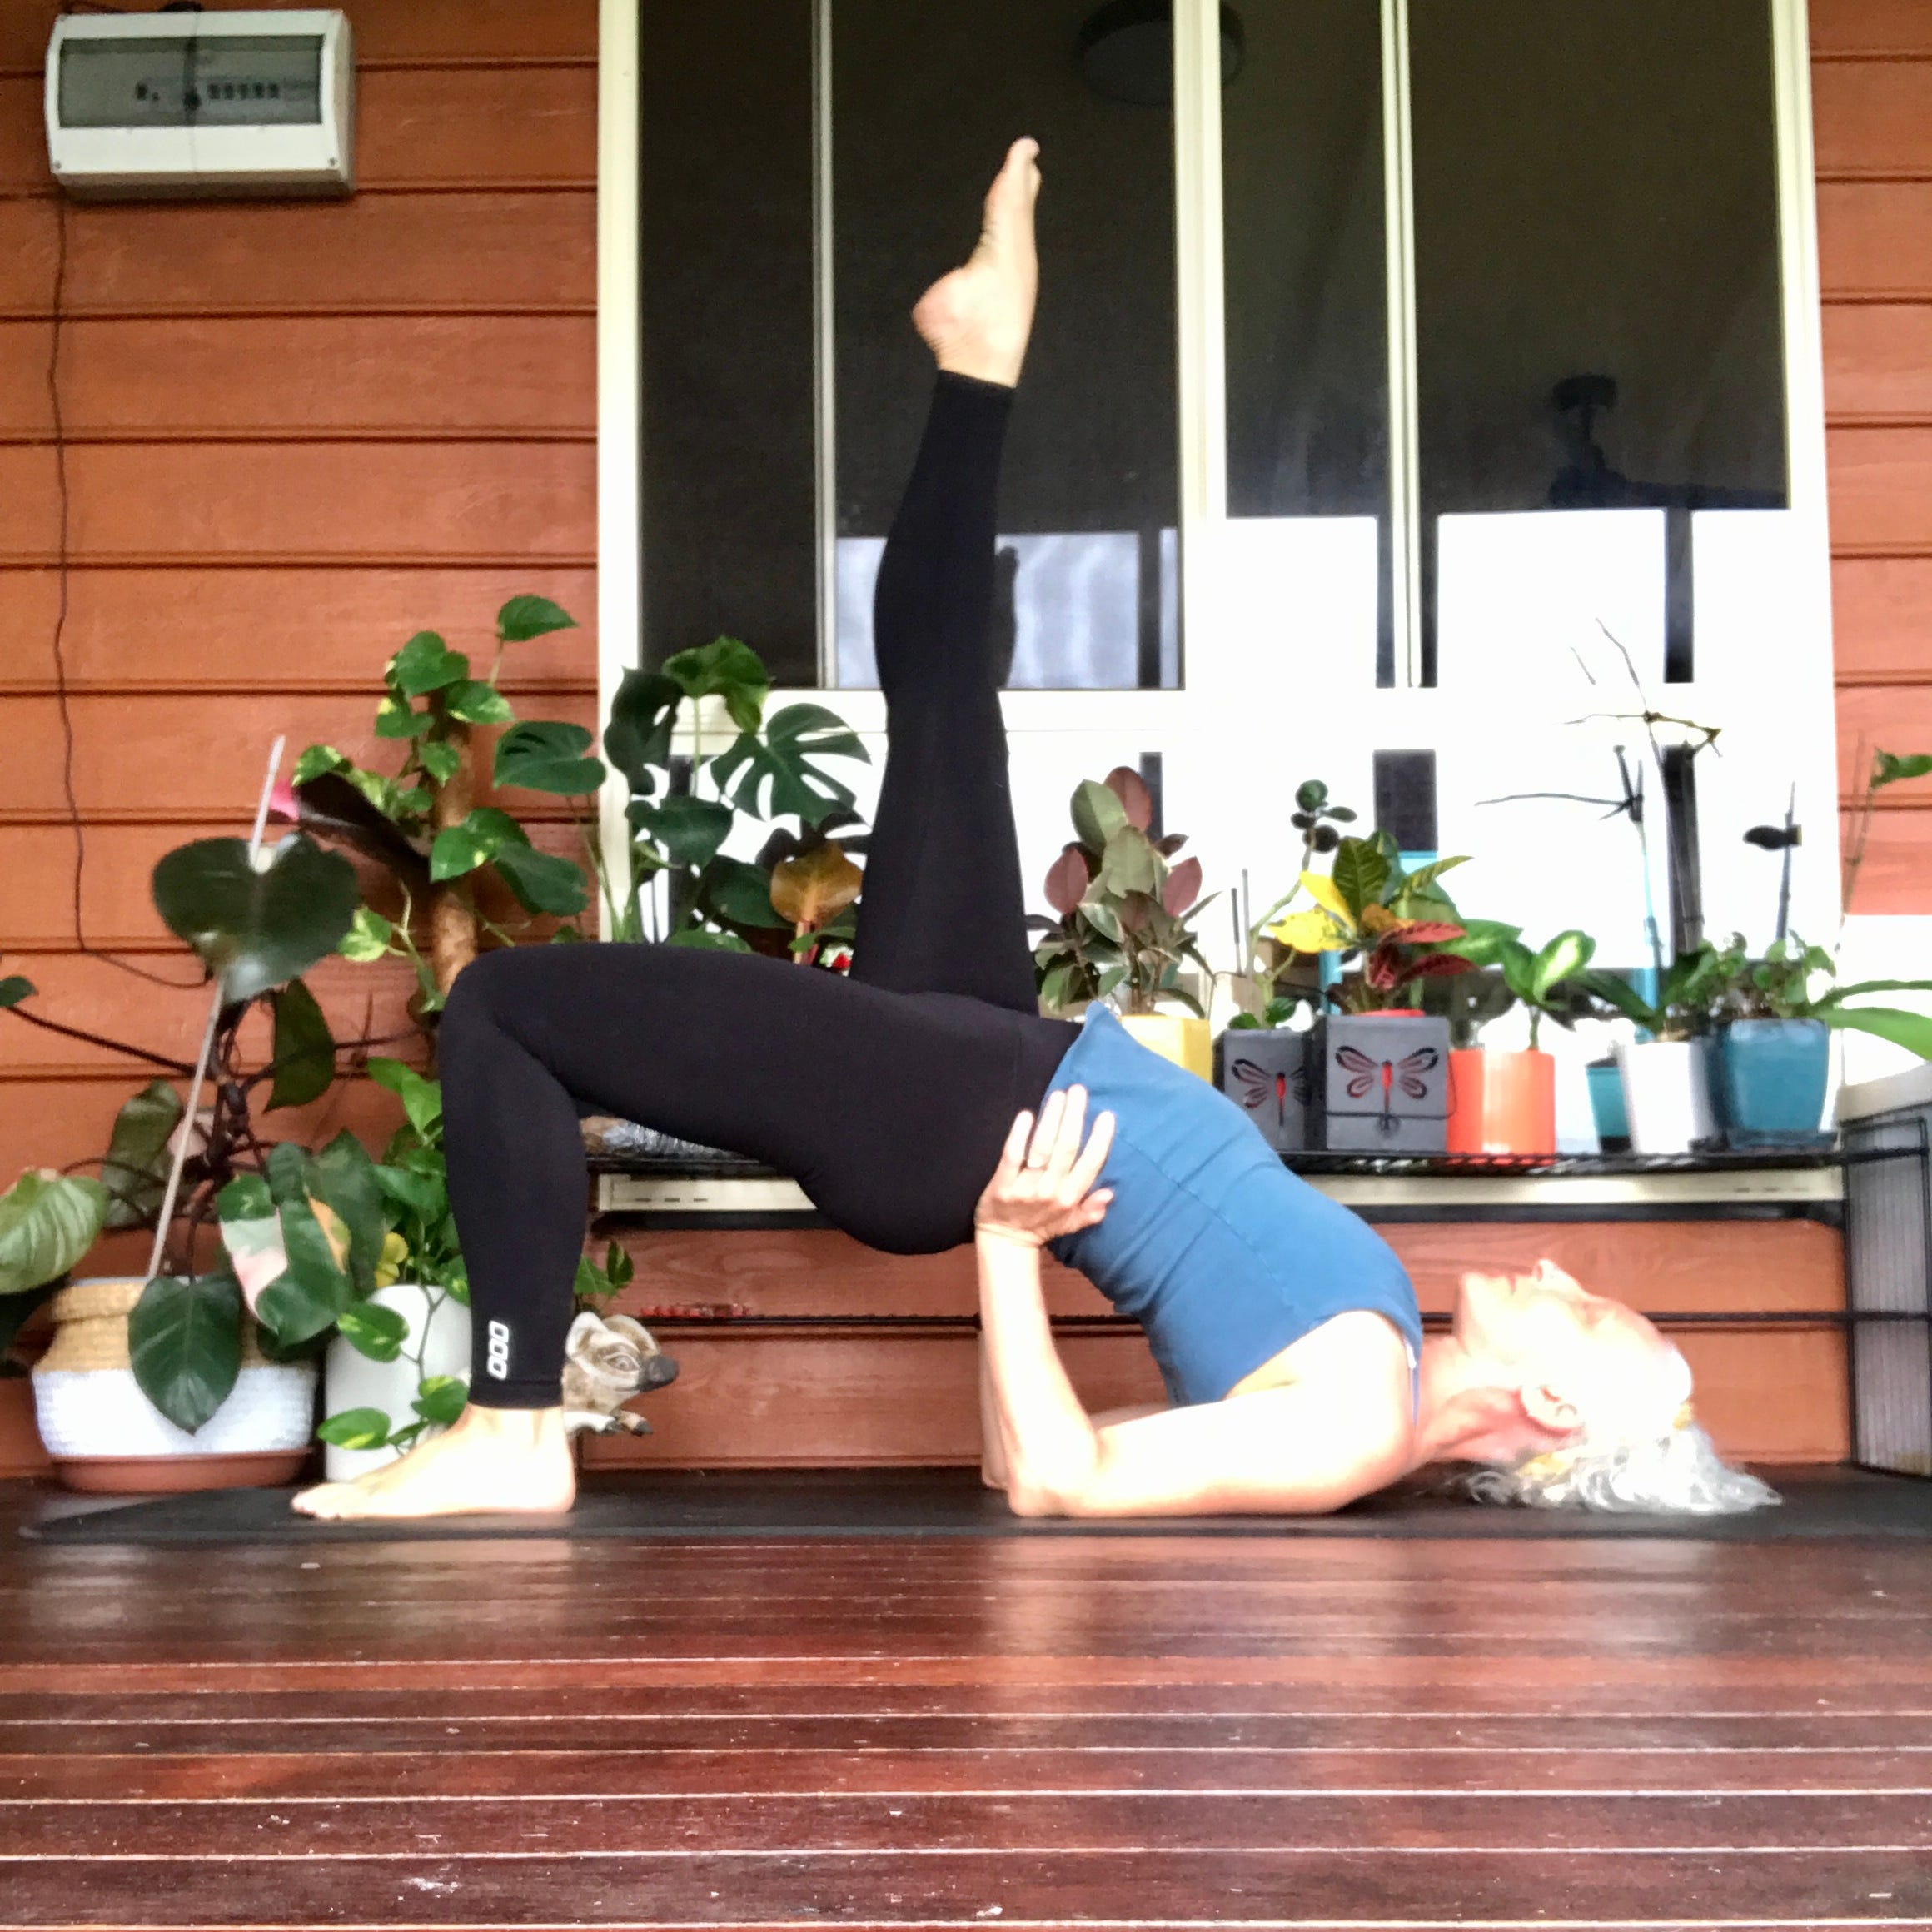
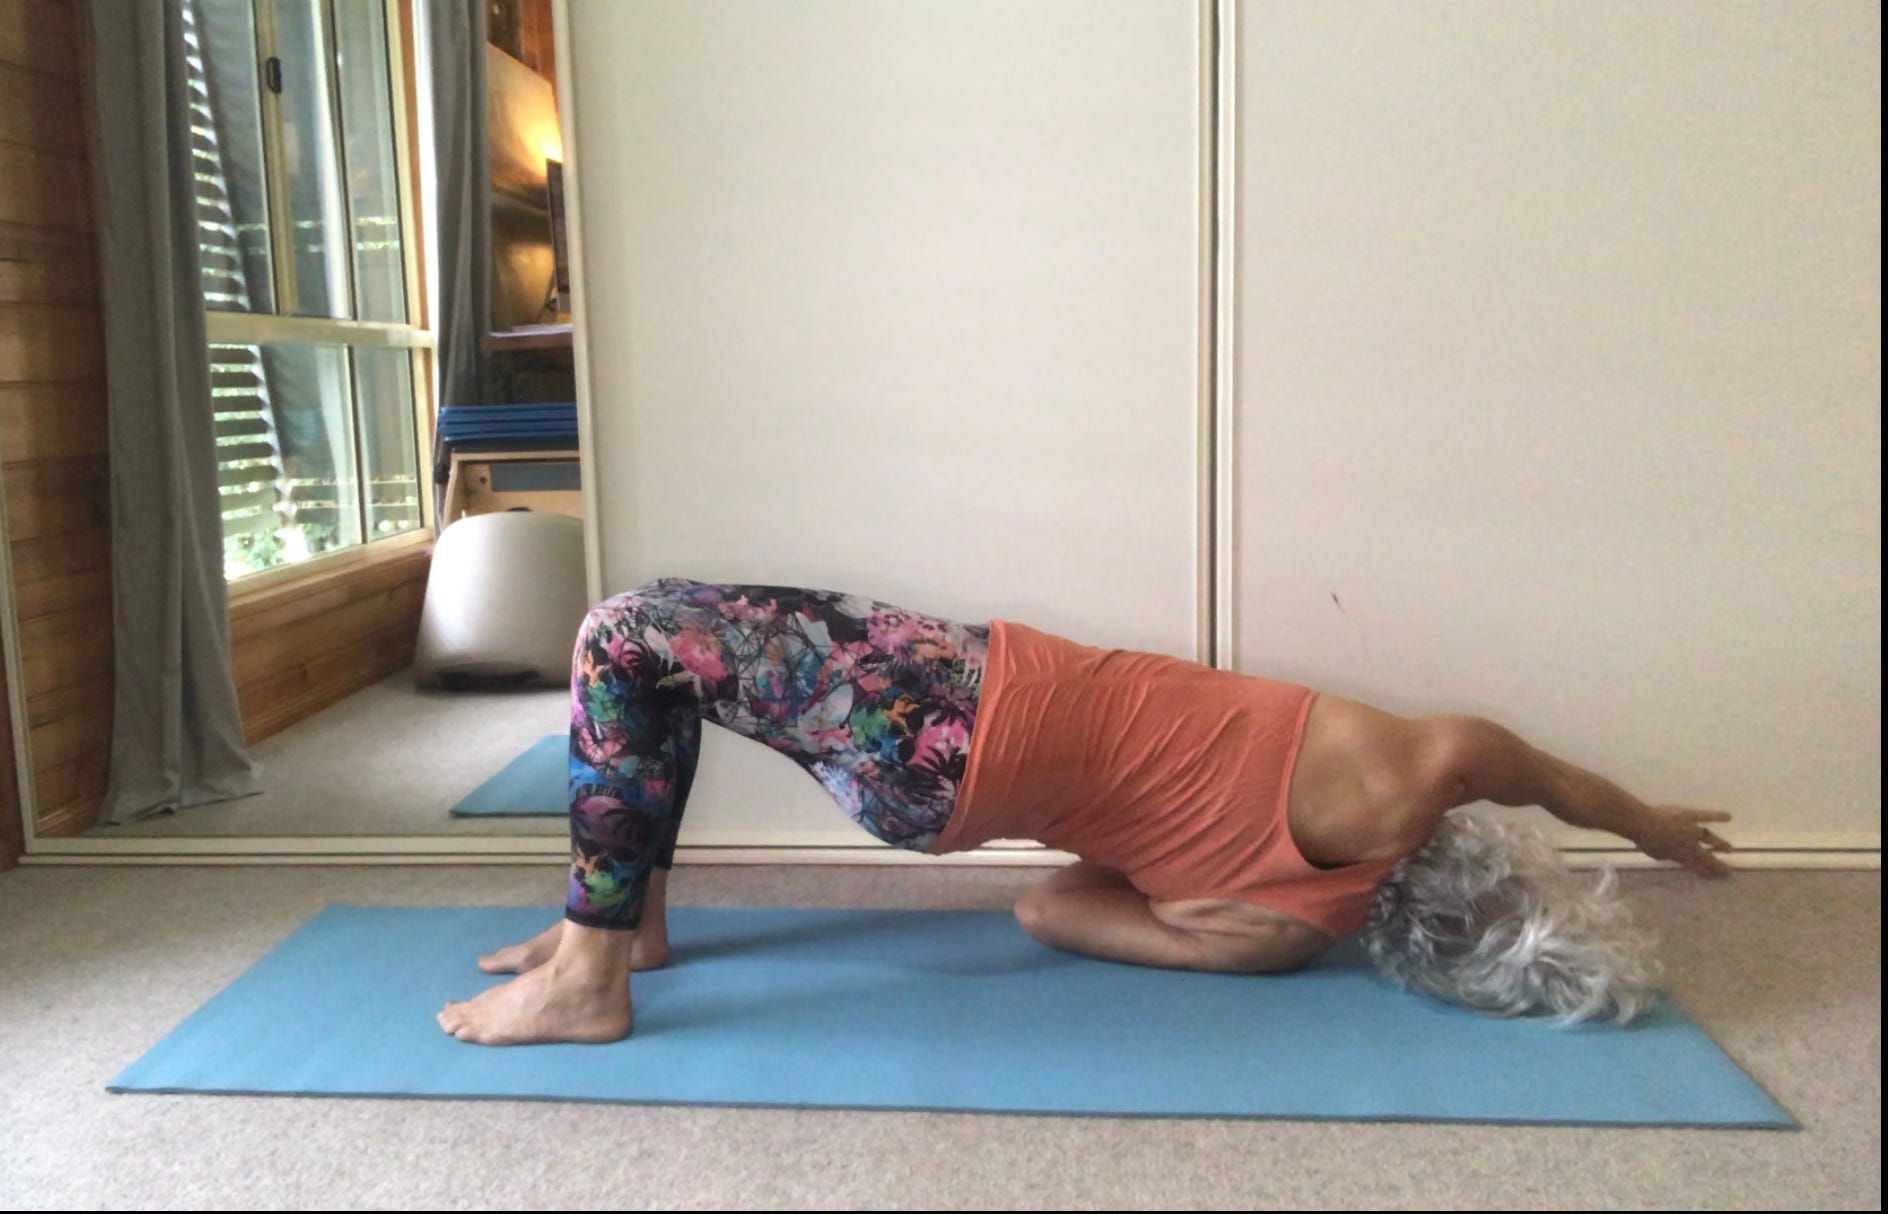
ADVANCED Version:
Hands are under the hips with the elbows tucked in, supporting the pelvis
The chest is open and lifted so the arc of the spine is a much higher version that the basic which is one long straight line from shoulders to pubic bone (I think of the advanced version as an inverted Swan or upside down Rocking)
There's no rolling up or down because you come directly into the exercise from the end of Scissors/Bicycle. again, check out the end of the video tutorial to see the transition in action

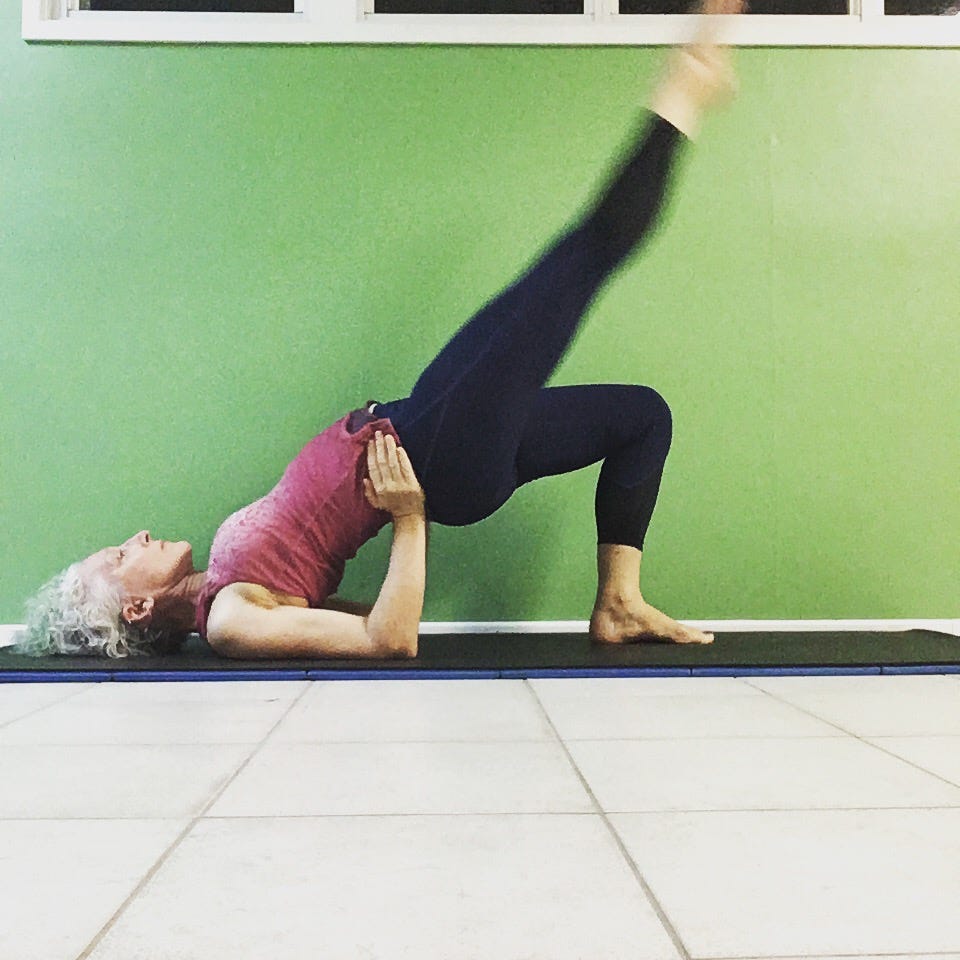
Basic Version VARIATIONS
When your hips are up alternate knee floats
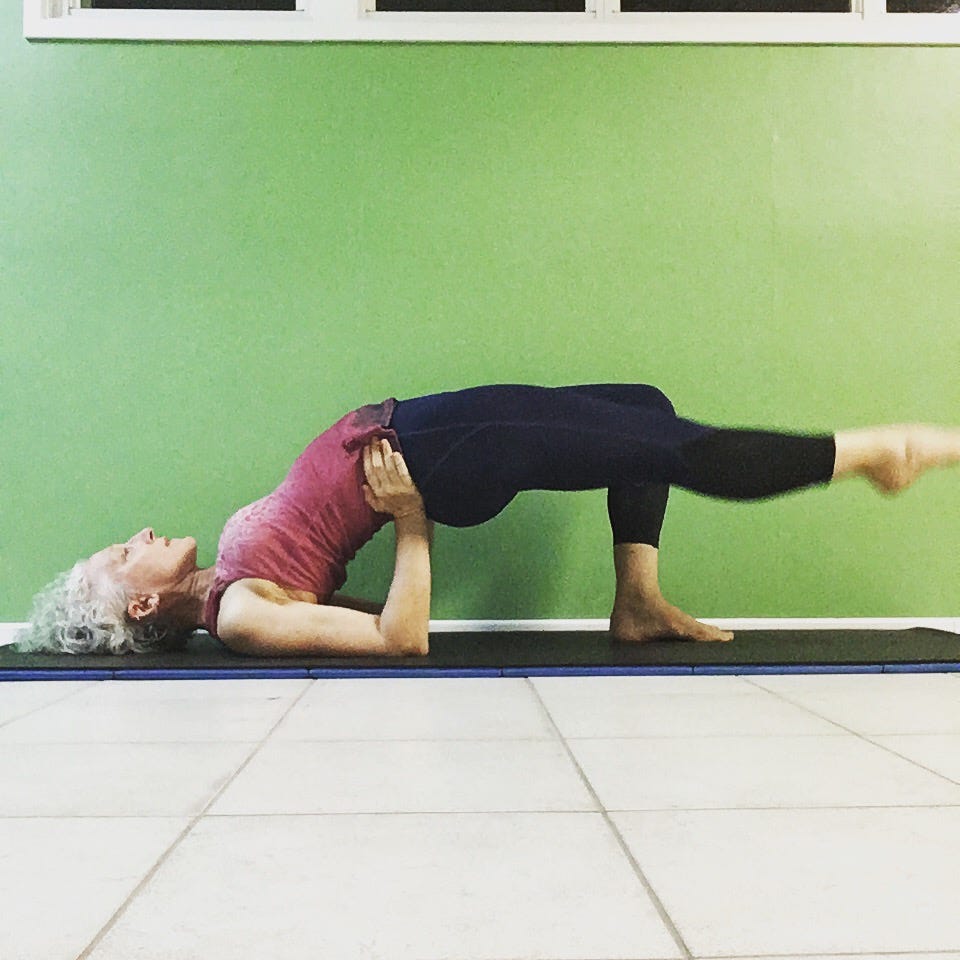
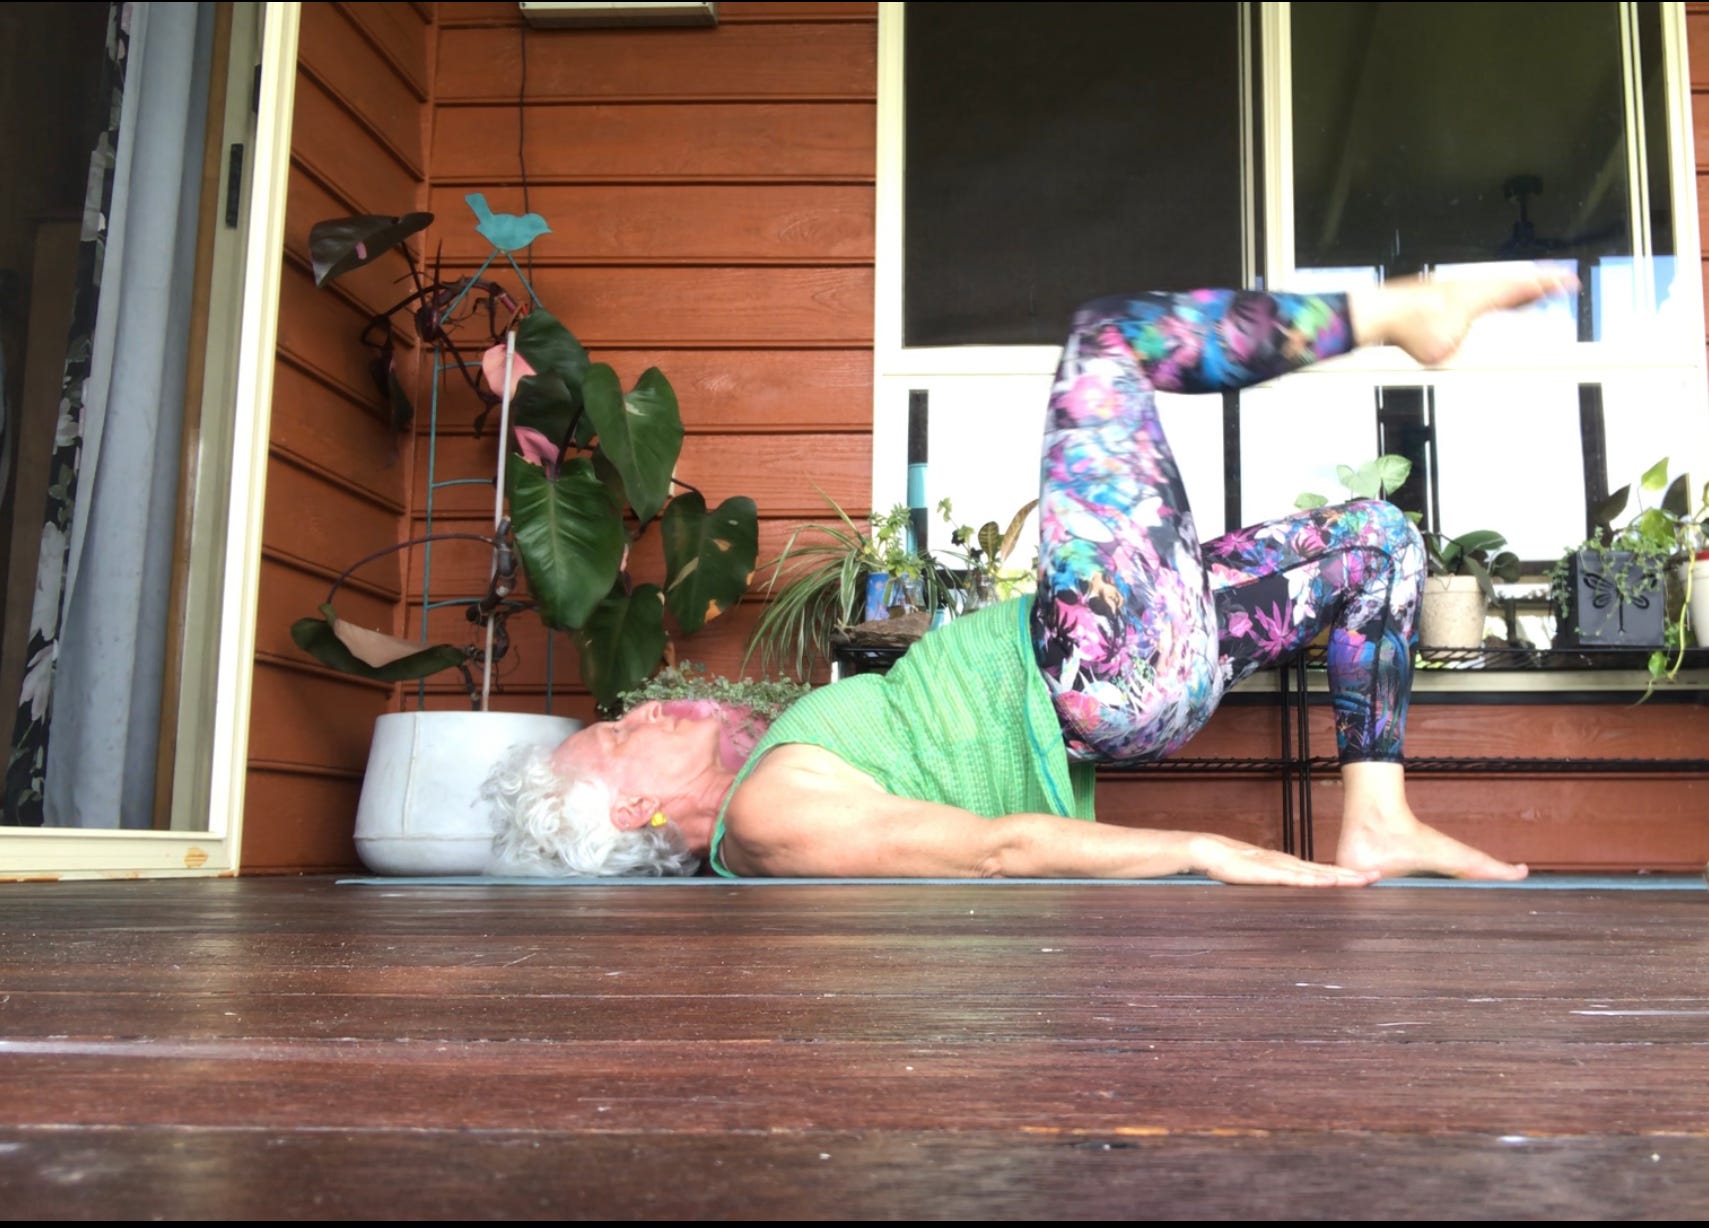
Add leg kicks, usually 6-8 a side with the ankle changing at the top, i.e. if your foot points on the way up then flex it on the way down and vice versa
Twisted Bridges are fun as well - see the photo below

knee floats while up in your bridge
Images for a better Shoulder Bridge
It's called Shoulder BRIDGE so think of the feet and the back of the shoulders as the four pillars of support.

Lengthen through the crown of the head so that as you roll you don't enable the shoulders to come up around your ears.
Notice if you have more weight on one foot compared to the other. I can't remember where I heard this image but imagine two bathroom scales under your feet each reaching 1/2 your weight. Maintain the equilibrium as you roll up and down - harder than it sounds!
A good image is to think of rolling a marble from your pubic bone smoothly up the centre of your body to the notch in your throat and then rolling it back down, reversing the pathway as you lower.

If you want to lift higher up, focus on the upper back lifting by bringing your shoulder blades towards the spine and opening the chest, instead of shoving your hips up and jamming into your low back (you'll still use your back, believe you me but you're still trying to have some spinal decompression).
When you're at the top of the bridge imagine your pelvis as a chandelier suspended from the ceiling.
My goal is to leave you with some new juicy insights into your Shoulder Bridge. Yes it can be a simple hip lift by why wouldn't you try to get the most out of it and take that knowledge into the rest of your Pilates practice?
I'm sure there are more things I could write but I'll leave it at that except to share two things:
One of Joseph Pilates’ most famous quotes.
The video tutorial below👇
Be Well,
xBec
The information contained above is provided for informational purposed only. The contents of this blog are not intended to amount to advice and Rebecca Forde disclaims all liability and responsibility arising from any reliance placed on any of the contents of this post.
Yes I think i am a bit more shut down in the front of the pelvis....more of a posterior tilt so the opening up in the front should be good for that then the glutes will be able to push through more strongly as the ext. rotation improves. I was quite badly pigeon toed as a kid and had special shoes made for me.....makes sense. Saved me a trip to the chiropractor!!
Your scissors and bicycle are so smooth!! Lovely work ....!!