

Pilates Exercise Dive: Corkscrew
A Pilates Exercise for Stability & Strength

Circle Up
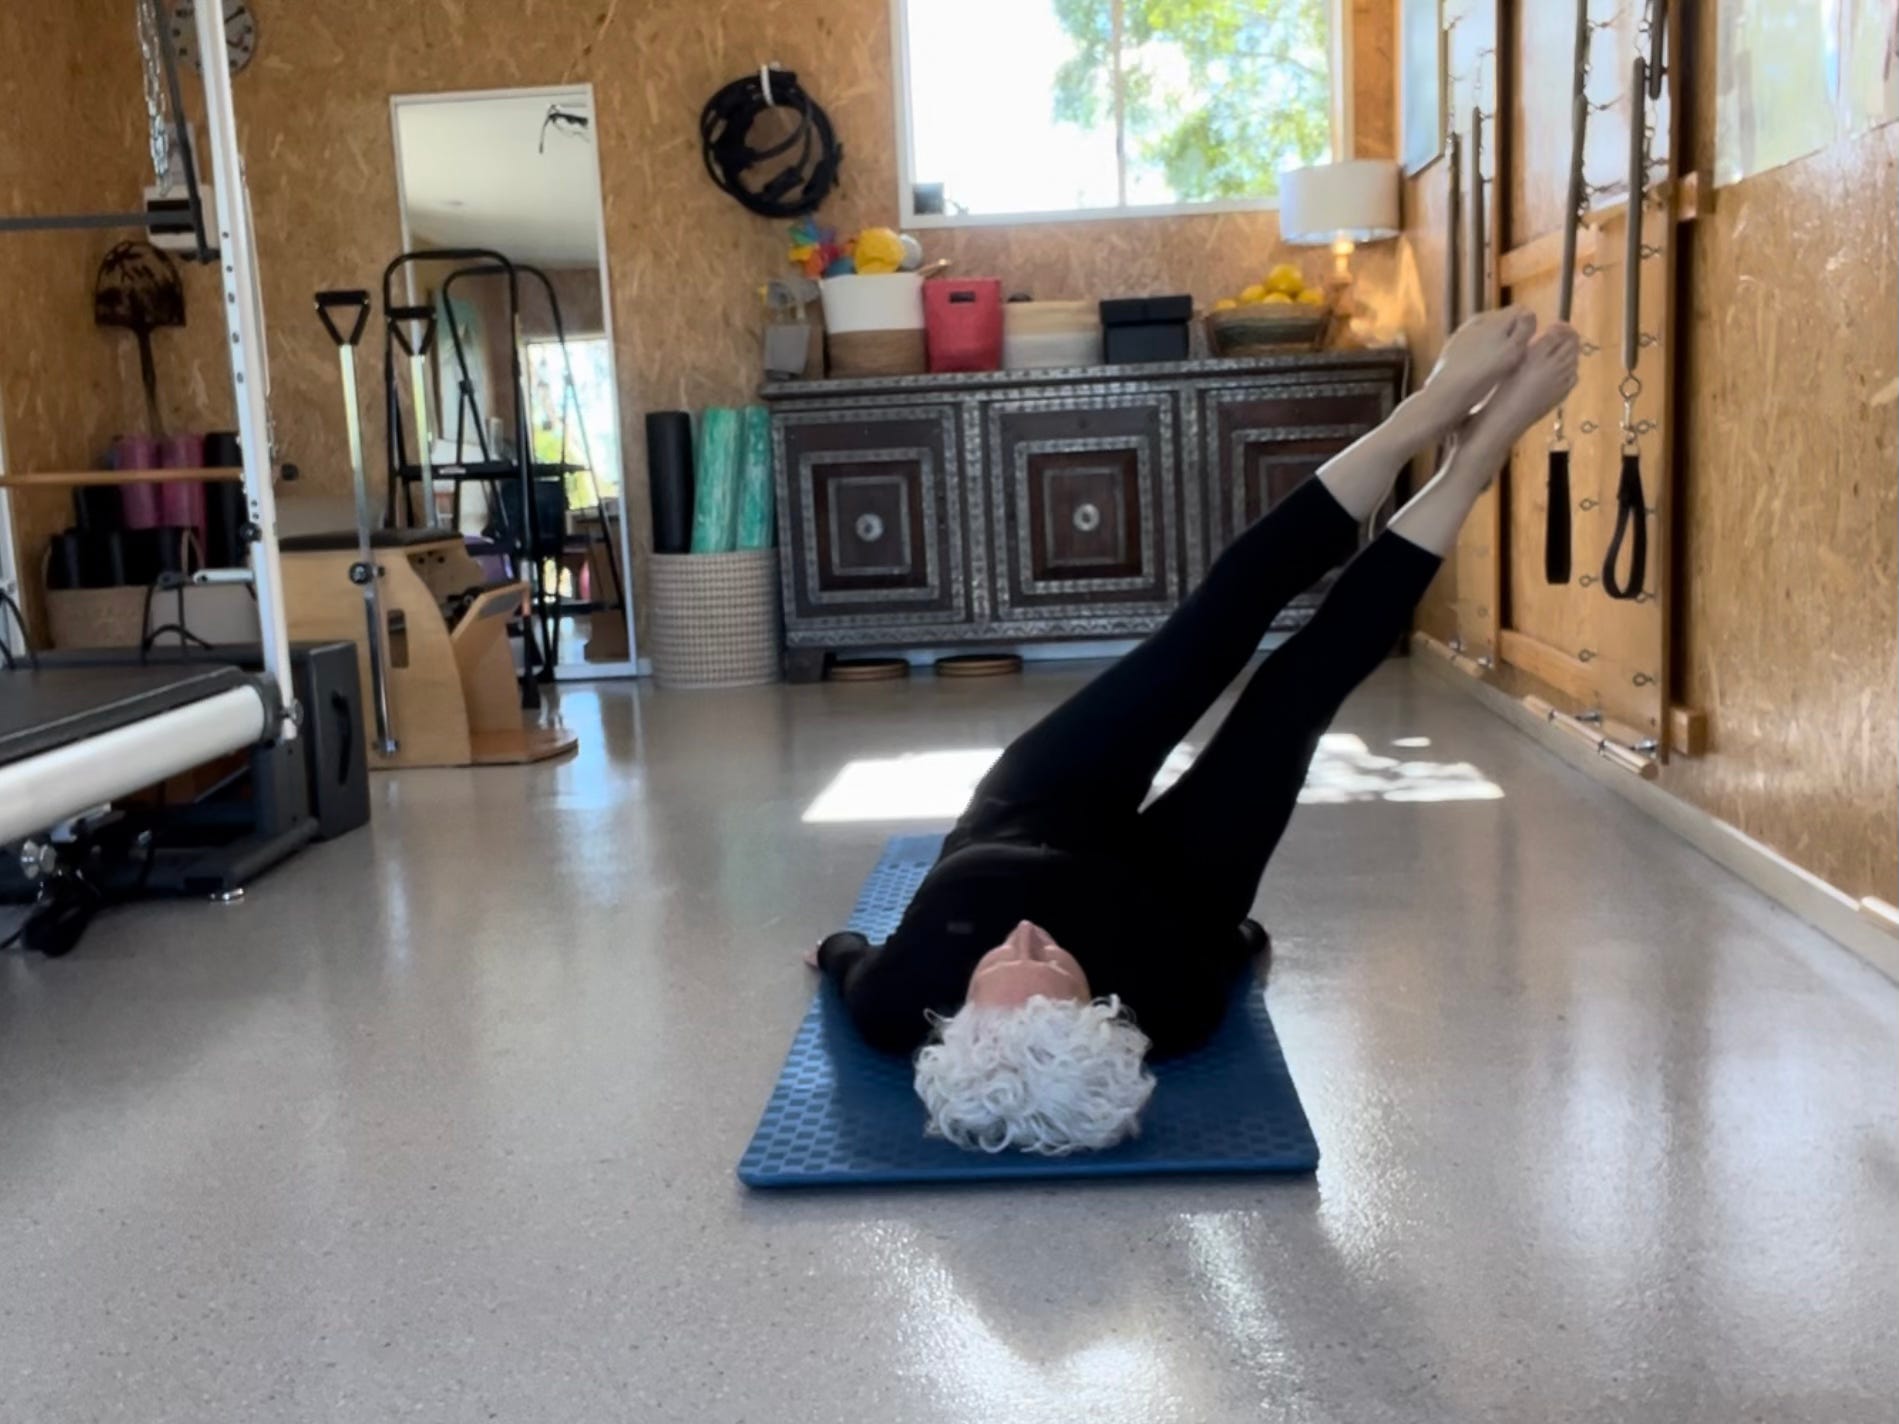
Let’s wave our legs up into the air for the Corkscrew! Welcome to an in-depth exploration of this Pilates mat exercise.
Make sure to scroll aaalllllll the way down for the video tutorial
In this blog post, we will delve into WHAT the Corkscrew is, HOW to perform it correctly (according to moi’), and WHY it should be included in your Pilates practice. Whether you're a beginner or a more advanced practitioner, you'll find valuable insights into enhancing your stability and strength through this dynamic exercise. Remember one of the great things about the Pilates Method is that any exercise can be modified, aka regressed or progressed, on the challenge scale. Corkscrew can be taught as a basic/beginning exercise and depending on the body, progressed to a super advanced one.
WHAT is the Pilates Corkscrew?
The Pilates Corkscrew is one of the original 34 exercises created by Joseph Pilates. It’s #10 out of 34 so about a third of the way through. It’s a dynamic spine twist will usually be the first twist of your practice (unless you perform Single Leg Circle with one).
Corkscrew requires significant stability and control from your deep core muscles and shoulder girdle. Despite its simple choreography (basically you hold the legs up in the air and circle them around) this exercise is challenging due to the intricate demands it places on your body, particularly in maintaining stability while twisting the lower spine.
HOW to Perform the Corkscrew
As usual I always like to include the man himself, Joseph Pilates, and look at his explanation of the exercise.
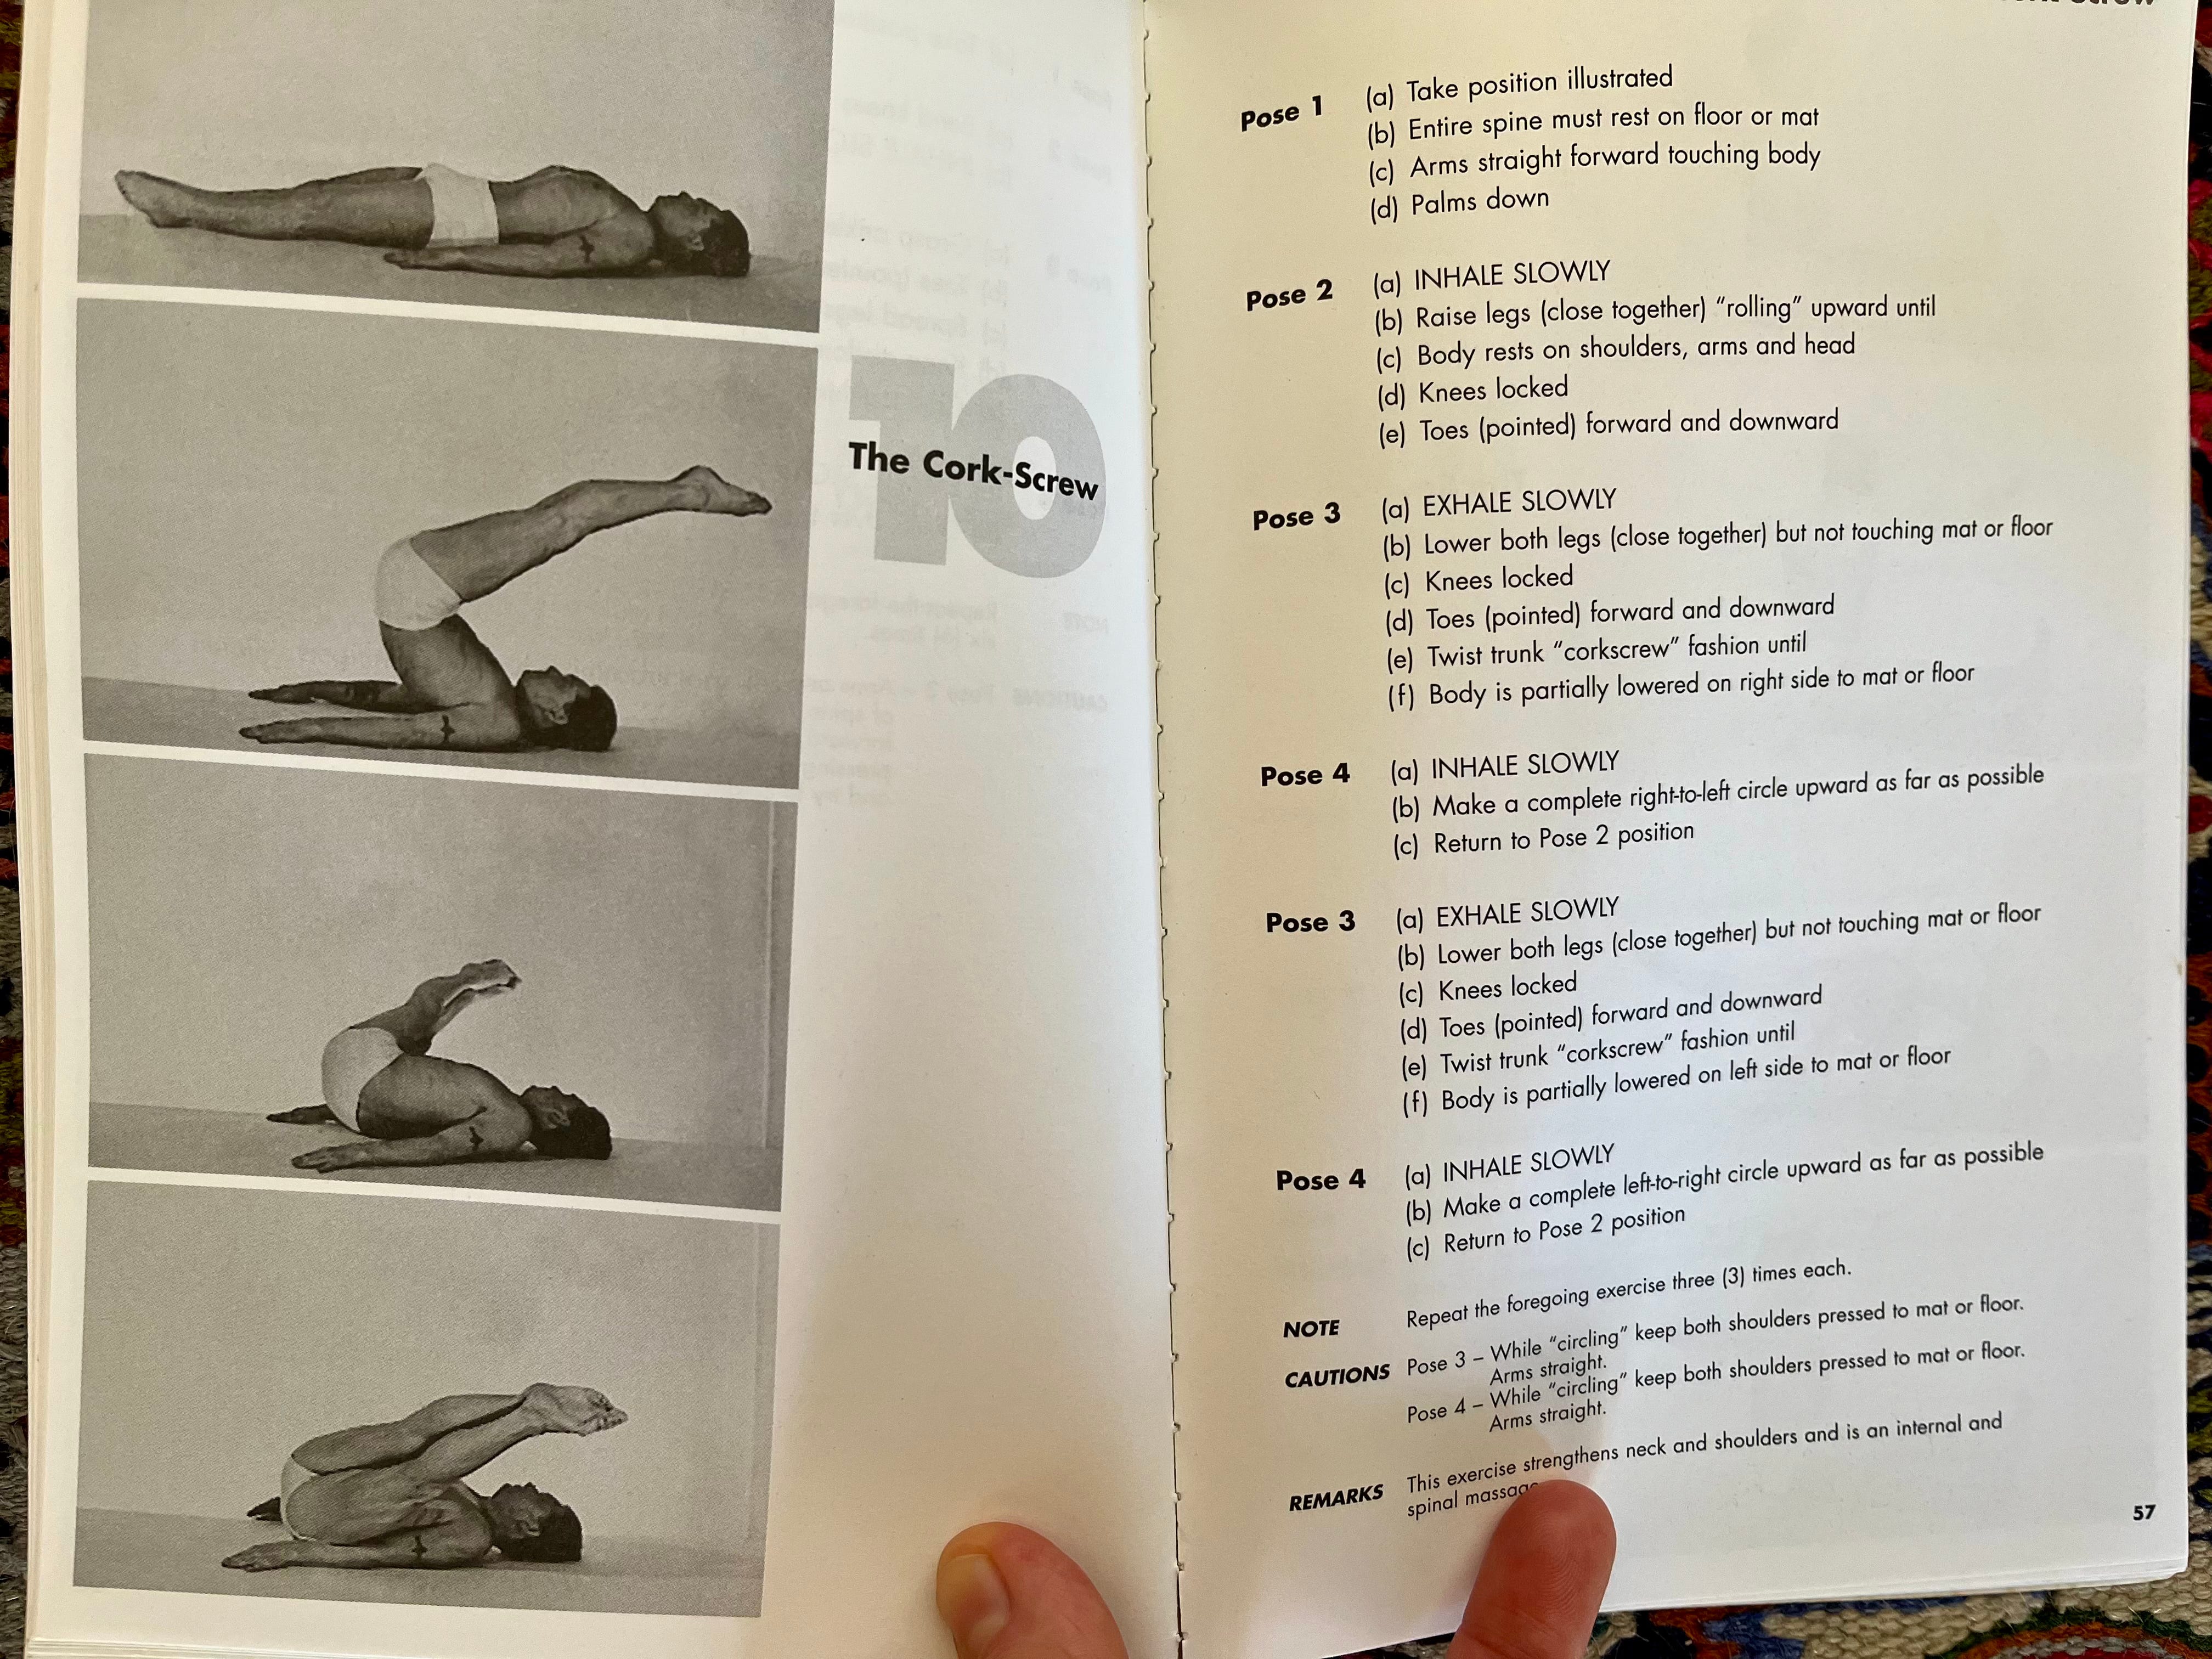
photo from Return To Life Through Contrology
Mr. Pilates’ instructions
Note: This describes the more advanced version; the italics are mine & “Pose” number = photo number from top to bottom
Pose 1
(a) Take position illustrated (lie flat on your back)
(b) Entire Spine must rest on floor or mat (I keep some space in my lumbar spine for a more neutral pelvic position mimicking the shape of my spine when I’m standing up)
(c) Arms straight forward touching body (I cue the arms a little bit wider, otherwise my pelvis crushes my wrists and hands when I twist my pelvis)
(d) Palms down
Pose 2
(a) INHALE SLOWLY (yes the all caps are his, I think this shows how much importance he placed on the breath)
(b) Raise legs (close together) “rolling upward until
(c) Body rests on shoulders, arms and head (as I stated this is the more advanced version. The regression is the spine all the way down and the legs up to the ceiling - see video)
(d) Knees locked
(e) Toes (pointed) forward and downward (aka plantar flexion)
Pose 3
(a) EXHALE SLOWLY
(b) Lower both legs (close together) but not touching mat or floor (this is where the twist begins)
(c) Knees locked
(d) Toes (pointed) forward and downward
(e) Twist trunk “corkscrew” fashion until
(f) Body is partially lowered on right side to mat or floor (even in the basic corkscrew, without the shoulder stand to start, if you’re twisting to the right, the left side of the pelvis and waist will be off the mat)
Pose 4
(a) INHALE SLOWLY (again, I can’t tell you how much seeing his all caps for the breathing makes me smile!)
(b) Make a complete right-to-left circle upward as far as possible (in the more basic version, this will be a semi-circle, the legs will start straight up to the ceiling and the circle will happen towards the mat, not over your belly button)
(c) Return to Pose 2 position
Pose 3
(a) EXHALE SLOWLY :-)
(b) Lower both legs (close together) not touching mat or floor
(c) Knees locked
(d) Toes (pointed) forward and downward
(e) Twist trunk “corkscrew” fashion until
(f) Body is partially lowered on left side to mat or floor
Pose 4
(a) INHALE SLOWLY
(b) Make a completer left-to-right circle upward as far as possible
(c) Return to Pose 2 position
NOTE Repeat the foregoing exercise three (3) times each.
CAUTIONS
Pose 3 - While “circling” keep both shoulders pressed to mat or floor. Arms straight.
Pose 4 - While “circling” keep both shoulders pressed to mat or floor. Arms straight.
REMARKS This exercise strengthens neck and shoulder and is an internal and spinal massage.
A few more HOWs from Me
Press the arms into the mat to engage the triceps, lats, and serratus anterior (in the more advanced version my triceps usually cramp!) As well as helping to keep the shoulder blades on the mat, this will also give you a better connection into the upper abs.
Adding on from above, be careful not to let your neck overwork! You also don’t want it to feel flattened. A quick tip is to keep your eyes up to the ceiling instead of down on your body.
Key into the connection of the pubic bone to the breast bone without shortening the torso, think length head to tail.
In the basic version, the pelvis will tilt, come flat, tilt to the other side and return to flat - all within one circle.
In the more advanced version, aka starting with the hips up over the shoulders, think of the spine augering down the mat while keeping both sides of the waist the same length. (easier said than done)
In the basic version ALL of the circle happens away from you, i.e. between your hip sockets and the floor, if you’re tight in your back, hips, or hamstrings this will be even more challenging. In the more advanced version the legs can come closer to the torso but make sure to keep them “light” otherwise they’ll collapse on to your chest.
Use as much oppositional energy & two way stretch as you can muster to help hold up the weight of your legs. You definitely also want to use your “underbum”, aka your glute/hamstring connection.
And, maybe most importantly, let your breath help! Corkscrew is one exercise where I can guarantee you, you’ll be tempted to hold your breath. Remember a full exhale will make a full inhale easier to attain.
Here’s a photo progression of the basic version:


Legs at 90 degrees
Legs to left, right hip & waist are lifted
Legs circling away from body, glutes on, Tish helping? and a Charlie tail sighting
Legs off to the right so now left hip & waist are off - both side waists are the same length
Back to where you began before reversing direction
Corkscrew’s Connection to Prior Mat Exercises
The Hundred (#1): one of the goals of the Hundred is to figure out how to hold up the weight of the legs from the deep trunk muscles and hips. You’ll use this skill in Corkscrew.
Single Leg Circle (#4): the precursor to Corkscrew has one leg straight down the mat for more simplicity and stability. Can you keep the dissasociation/dissociation between the thigh bones and hip sockets when you add both legs up in Corkscrew?
Rollover (#3): This is the first time in the mat sequence that the hips are lifted up over the shoulders. Corkscrew adds the legs lifting higher towards the ceiling, upping the challenge even before you start twisting and lowering your spine down. Fun times!
Roll Up (#2) then both Rolling Like A Ball (#5) & Open Leg Rocker (#9): These three exercises train you how to roll smoothly through your spine. Finding the control to fight gravity’s pull on your pelvis is definitely one of Corkscrew’s demands.
WHY Do the Corkscrew Exercise?
Corkscrew is more than just a twist; it’s an exercise that builds upon the fundamentals of Pilates. Whether you practice the basic or more advanced version, here’s why it’s a valuable addition to your Pilates practice:
Flexibility and Mobility: The Corkscrew promotes flexibility and mobility in the lower spine. By twisting the pelvis and lower spine, you increase the range of motion and enhance spinal health. The caveat is that you also work on the strength of your pelvis and torso, making sure that your range of motion is just at the edge of your strength and control - that edge will move as you get stronger!
Enhanced Proprioception: Performing Corkscrew helps improve your body awareness and proprioception. Being upside down always makes it more challenging to know where your body is in space. Case in point, what I thought I was doing aaannnnd what I was actually doing when I watched the tutorial video back did not match. This is only one reason why it’s great to have an instructor’s eyes on your body. Take some private sessions or group classes!
Coordination & Flow: These two Pilates Principles are key here. Moving your legs in a circular motion challenges your ability to control and coordinate your movements. In the advanced version you’re also looking for that fluidity as you roll through your spine. Remember the breath will really help, I promise!
Shoulder and Upper Body Strength: This is a biggie! As you lift your hips and legs off the mat, your shoulders and triceps work to stabilise your upper body. Even if you’re doing the basic version, this exercise enhances upper body strength and stability.
The Love of a Challenge: Yes, this is a hard exercise (even at the basic level) but wow, the feeling when you know you’ve done it well, is well… wonderful!
Conclusion
Incorporating Corkscrew into your Pilates practice can greatly enhance your strength, stability, and overall body awareness. This exercise offers a rewarding challenge that contributes to a balanced and strong Pilates practice, whether you’re a beginner or an advanced practitioner. Remember to enjoy the process of mastering this dynamic movement. Pilates should be fun!
Video tutorial below Joe’s quote
Happy practicing!
xBec

The information contained above is provided for information purposes only. The contents of this blog are not intended to amount to advice and Rebecca Forde disclaims all liability and responsibility arising from any reliance placed on any of the contents of this post