

Pilates Exercise Dive: Hip Circles or Twist On Hip or Hip Twists
Whatever their name they’re a challenge


Hip Circles / Twist On Hip / Hip Twists
Three Names - One Challenge
Make sure to scroll all the way down if you want to see the video tutorial
Today, we’re diving into the world of Hip Circles, aka Hip Twists, aka Twist on Hip(s). For the sake of consistency—and my sanity—we’re sticking with “Hip Circles” because when I first learned it, that’s what it was called.
Allow me to not only date myself but honour my weirdly free-associating brain. Today’s exercise brings to mind Dire Straits’ 1983 boppy summer hit “Twisiting By The Pool”. Your hips will be doing a lot of that in this Pilates classic no matter what you call it!
This exercise isn’t just challenging; it’s a full-body wake-up call, demanding strength, coordination, and a certain amount of grace under pressure. Let’s break down the what, how, and why of Hip Circles, and see if we can make this torturous exercise a bit more fun (or at least less daunting).
Joseph Pilates
First up let’s check out Mr Pilates performing as he called it The Hip Twist With Stretched Arms:
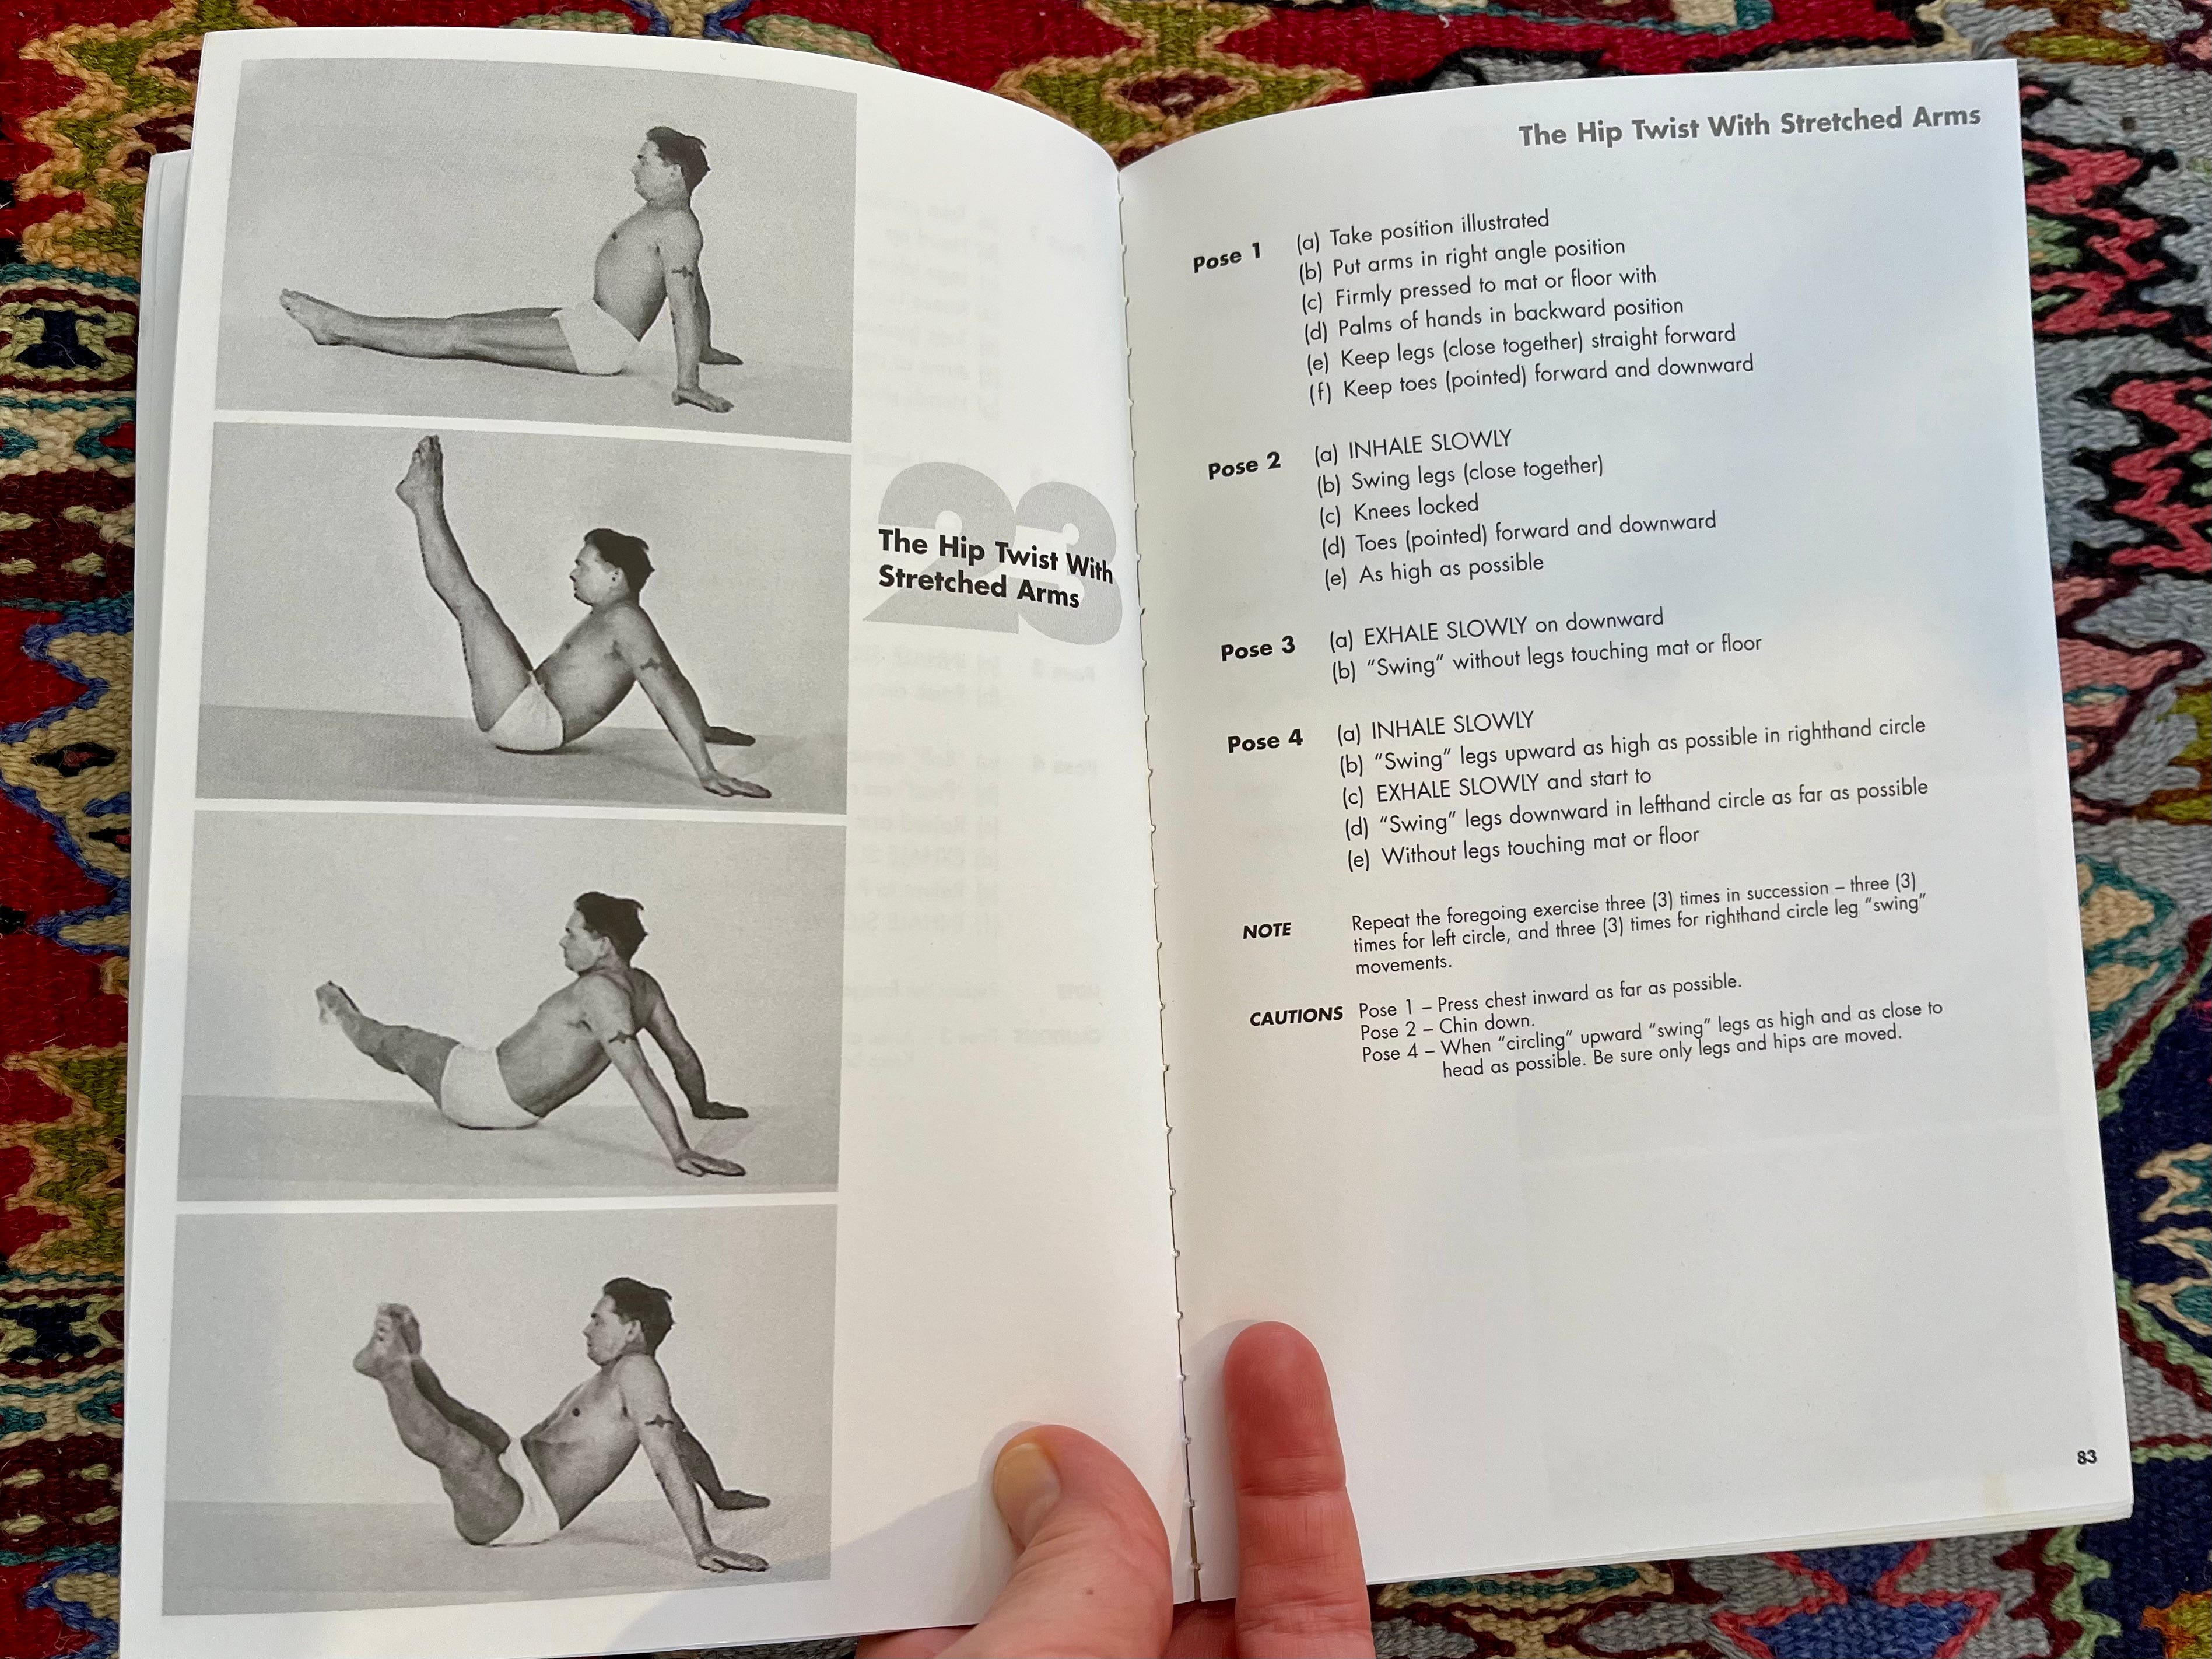
He looks great except that I would take him to task for his head and neck placement. I’d cue a bit more decompression in that neck and tell him less Turtle Head and more Pug Face.
But back to the exercise…
The What
So, what exactly are Hip Circles? Aside from being number 23 in Joseph Pilates' original 34 Matwork exercises, in their fully expressed version, they’re a super duper challenge. The goal is to hold yourself up with weight balanced between your hands and bum while twisting your lower spine and driving your legs around in a circle.
Hip Circles targets your core, hips, upper back, shoulders, and legs (okay, let’s just say the whole body). I’d say not only will you use pretty much every part of your body, you’ll also use every Pilates skill you’ve ever developed, and be forced to call on every single Pilates Principle:
Breath
Flow
Precision
Concentration
Control
Centring
“Twisting by the Pool” is definitely a good time but Hip Circles, I have to admit, is an exercise that I rarely feel boppy about. Remember the less of your body on the mat (in this instance only your hands and bum) the more you have to rely on your internal strength and proprioception skills (the ability to know where your body is in space).
Hip Circles could possibly be the Pilates standard bearer of the fight between stability and mobility. The upper back, chest, and arms stay stable while the lower half moves.
Hip Circles is one of those choreographically simple yet deceptively difficult exercises. It’s one that makes you say, “Oh, that doesn’t look so hard!” until you actually try it.
Spoiler alert: It. Is. Hard. But isn’t the challenge half the fun? I know there are many reason to practice Pilates but this should be a main one - the fun to be found in the challenge.
The How
Now, let’s get down to the nitty-gritty of how to perform Hip Circles, remember this is for the full expression of the exercise - scroll down for descriptions of two variations.
Start: Sit down on your mat, lean back and reach far enough behind you that you can balance just behind your sitz bones, aka those two boney protrusions under your bum, aka your ischial tuberosities. Lift your legs and reach them upward. They’ll be in your Teaser position. (Side note: Teaser is the exercise that directly precedes Hip Circles in the Pilates sequence and there’s a bit of a fab transition between the two).
Body Placement: Your hands are behind you, with the fingers facing back or slightly to the side, your shoulders are in external rotation to help open your chest and extend your thoracic spine. I was taught that we’re trying to reverse the natural curves of the spine, so an extended thoracic with a slight scoop of the lumbar spine which happens by engaging your deep abdominal muscles in, up, and back. The body is going to want to sag because GRAVITY and your job is to lift out of that. Puff up your chest and let your shoulder blades glide towards the spine (without crushing them together) and say “hello” to your quads and hip flexors.
Movement: Twist your hips to one side, allowing your legs to follow in the same direction. Draw a circle with your toes, moving down and across the body, then bring your legs back up the other side to their starting position. That’s half a set, so don’t forget to reverse the direction for the other half! Please note that Mr. Pilates says to do three circles in one direction and then reverse but I teach it alternating so that you cannot use momentum.
Breath: Take a full breath for each circle. Inhale as you twist and exhale as you bring the legs back up. It’ll be oh so tempting to hold your breath as the legs come back up but that just means you’re going to hoick them up. The breath is key to finding those other five Pilates Principles!
Variations!
There are two variations of Hip Circles which puts the exercise firmly back in the Beginning to Intermediate level.
Everything is the same except that instead of being up on your hands you’re lowered down onto your elbows and forearms. This does three things: More of your body is on the mat for support, it’s easier to maintain the extended upper back, and it’s easier to hold up the legs because by lowering your torso you’ve shifted your centre of gravity. This is the variation of Hip Circles I teach 90% of the time. Don’t worry, it’s still very much a challenge, especially if you have a tight upper back and /or tight hamstrings and hips.
This other variation is called Can Can. You’re back on your elbows and forearms as above but you also decrease the challenge of holding up the weight of the legs by bending the knees. This lessons the load on the abs and gives the hip flexors a bit of a rest, it’s also a great place to get a hamstring stretch after your third sway. This can still be a challenging exercise because while the strength component of the full Hip Circles is decreased, the choreographic and timing demands can mean it’s not easy for some.
Watch the embedded video at the bottom of the post for both of these options explained or leave a comment with your questions.
Building Block Exercises
Now let’s back track and identify which exercises or variations you could perform to build the skills needed for a rock solid set of Hip Circles. Here are a select few:
Corkscrew, this is probably the most obvious one because you could consider Hip Circles as a more advanced Corkscrew. It’s the same leg pattern but with the spine flat on the mat (unless you’re doing the hips off version).
Tick Tock, (like the clock, not the social media platform). This is the first part of the legs circling where they would just go side to side. You could also call it Straight Leg Knee Sways.
Single Leg Circle, this is where you practice the pathway the legs will eventually take with just with one leg at a time.
How about all of the Pilates exercises where you work on your upper back extension, mobility, and strength: Swan, Swan Dive, Single and Double Leg Kick, Shoulder Bridge, and Scissors & Bicycle?
Let’s not forget the exercises that train us how to negotiate those moving legs and find the necessary hip strength to hold them up: The Hundred, Rollover, Double Leg Lower Lift, and the aforementioned Teaser.
The Why
Why put yourself through the struggle of Hip Circles? Besides the fact that they’re an advanced exercise designed to challenge everything you’ve got, they’re a fantastic way to highlight areas in your practice that need improvement.
If you can pay attention to where you struggle you can figure out what pieces of your Pilates practice you’re missing. This is how you adopt personal responsibility for your own progression and turn your instructor into your guide instead of your drill sergeant.
Hip Circles give you great insight into how to use your internal strength and body awareness to stay stable. Because of the balance/propripception challenge your core, supported by your breath, has to do the heavy lifting - literally.
I guarantee your Pilates technique will also be challenged in Hip Circles because it’s towards the end of the Classical Flow when fatigue will kick in. Remember when you’re tired your less than optimal habits will want to kick in, this is where your Concentration can really help.
Moreover, Hip Circles are a synthesis of skills you’ve been building throughout your Pilates journey. They combine stability and mobility, upper back extension, core strength, and hip strength.
Conclusion
Hip Circles are challenging, comprehensive, and can be an incredibly rewarding Pilates exercise. They’re a synthesis of skills you’ve been building throughout your Pilates journey. They combine stability and mobility, upper back extension, core strength, and hip strength.
If you’re struggling, it’s your body’s way of telling you where you need to focus more attention in your practice. Plus, there’s a certain satisfaction that comes with mastering something so deceptively simple. How many times have we been told that it’s not about perfection but progress? Really try to remember this and find the fun, pleasure, and satisfaction on your mat.
One of the things I love about Pilates is that the more you practice the more you can discover. That’s what keeps me excited after all these years of teaching and practicing.
The video tutorial is below the Joe quote, enjoy.
Thanks for reading, and happy twisting & circling!
xBec
P.S. I’m mostly teach online these days so pretty much no matter where you are in the world I have openings for Private sessions. Whether you’re ready for the full version of Hip Circles, a very gentle set of Single Leg Circles, or you’re a complete Pilates newby, I can help guide you to a more fulfilling Pilates practice.
P.S. I’m still working on this👇
The information contained above is provided for information purposes only. The contents of this blog are not intended to amount to advice and Rebecca Forde disclaims all liability and responsibility arising from any reliance placed on any of the contents of this post